Whether you are a lighting professional at a massive festival or a DJ looking to elevate your mobile sets, understanding the technology behind a laser light show projector is the first step to creating a world-class visual experience.
At Pangolin, we believe that excellent education fosters a safer, more creative process. This guide breaks down everything from internal anatomy to the crucial specifications you need to know before making a purchase.
The Basics of Laser Light Show Projectors
A laser light show projector (often called a “show laser”) is a specialized system designed to project laser content in a controlled area. Unlike standard stage lights, these projectors create high-contrast, razor-sharp effects including:
- Aerial Projections: Beams and fans visible through haze.

- Graphics & Text: Animated logos and scrolling text, often used for corporate branding

- Laser Mapping: Highlighting architectural lines on buildings or stages.

These effects are used across a wide range of applications- from festivals and cruise ships to architectural lighting and home hobbyist setups.
The Anatomy of a Professional Laser Projector
To choose the right system, you must understand both the external "housing" and the internal components.
External Components & Housing
The housing protects sensitive optics. A key specification here is the IP (Ingress Protection) Rating. Indoor use typically requires standard housing, but outdoor festivals require a high rating (IP-54 or higher) to protect against dust and moisture.
| IP Rating | Protection Level | Best For |
|---|---|---|
| IP-20 | Basic protection | Indoor, clean environments |
| IP-54 | Dust & splash resistant | Outdoor festivals, temporary use |
| IP-65 | Water-jet resistant | Permanent outdoor installations |
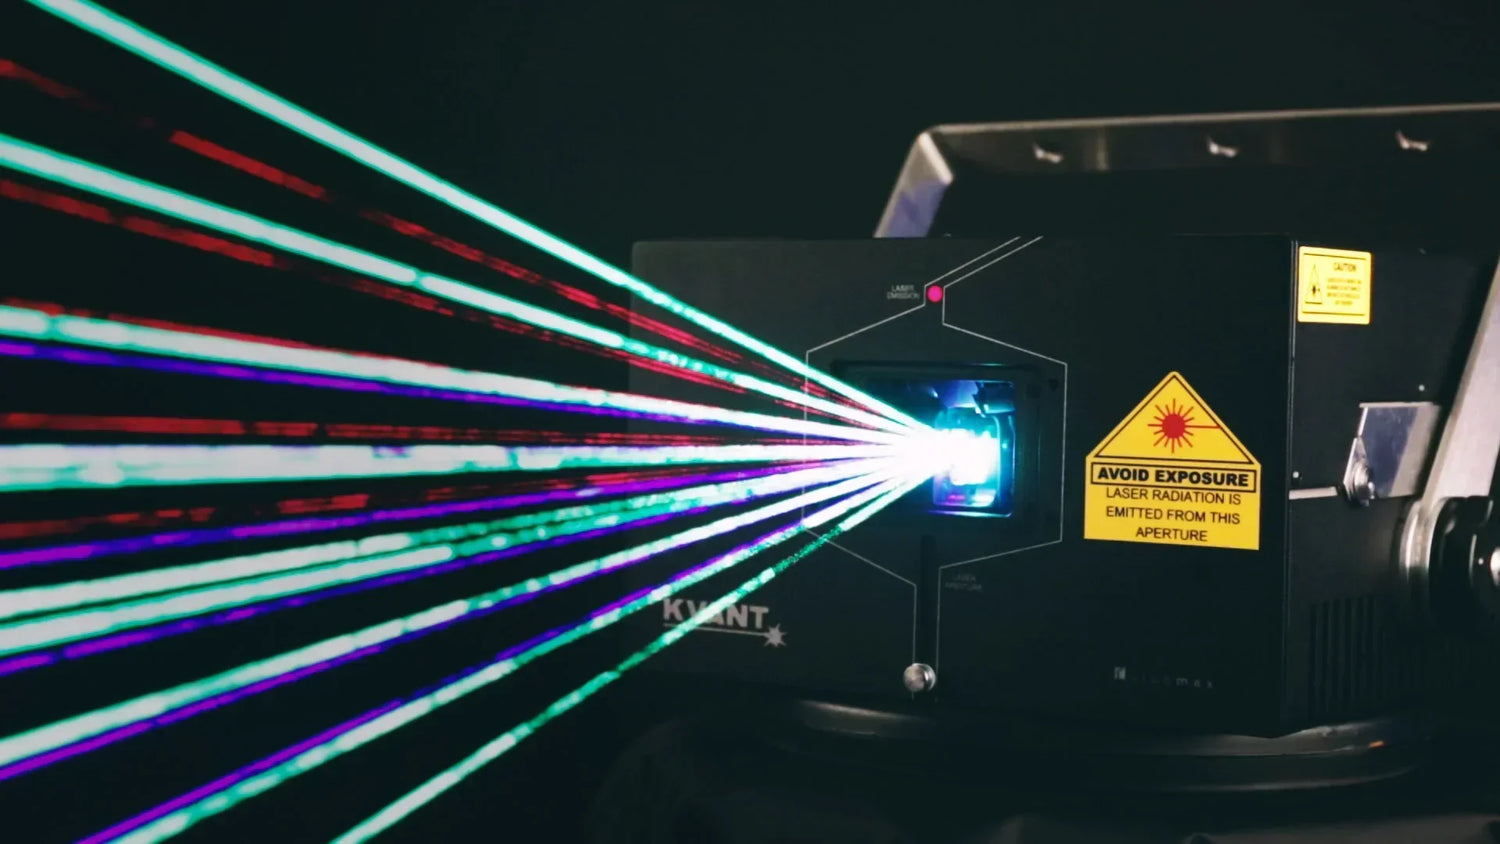
The Front Panel: Safety & Emission

The front of the laser contains features critical for safety and compliance with CDC, ANSI, and ILDA guidelines. These integrated components serve as the primary line of defense, ensuring that the high-intensity light remains controlled and within regulated parameters during operation. By adhering to these rigorous standards, the hardware minimizes the risk of accidental exposure to both operators and the public. To maintain this high level of safety and operational integrity, the following elements are standard on the front housing:
- Laser Aperture/Window: The glass exit point for the beam. Pro Tip: Always measure your laser’s wattage here, not inside the unit.
- Manual Shutter: A metal flag that physically blocks the beam path when the laser is not in use.
- Masking Plate: Adjustable metal plates used to manually block the laser from hitting specific zones (like an audience or a camera).
- Emissions Indicator: A light that illuminates whenever the unit is actively emitting laser light.
- Mounting Bracket: Also known as a yoke, works to either prop the unit up while on the ground or connects to a clamp to be mounted to a pipe or truss.
- Warning Sticker: A mandatory bright yellow label for all US-based projectors.
The Back Panel: The Control Hub

This is the central hub where you establish a direct interface with your laser system’s core hardware. These sophisticated control centers have evolved far beyond simple switches, now serving as the primary bridge between your digital designs and physical output. To ensure peak performance and safety, modern systems include:
- ILDA: Standard analog ports for connecting external control hardware or daisy-chaining projectors.
- DMX / ArtNet: Common protocols for controlling lasers from a lighting console.
- Pangolin FB4: An integrated media server (essentially a small internal computer). It allows for full control of colors, safety parameters, and geometric correction without needing an external interface.
- E-Stop (Emergency Stop): Required by law in the US. These ports allow you to daisy-chain multiple lasers to a single safety kill-switch.
- Safety Keyswitch: A physical key that must be turned to the "On" position to power the unit.
- Power In/Out: Not all lasers will feature the power out port, but it’s become a lot more common to build both power in and out ports into the laser projector, which allows you to daisy chain multiple units together, simplifying cable runs.
If you would like to know more about laser connections, here are some links to the Pangolin Wiki:
Internal Components: Generating the Light
To produce its effects, a laser projector combines red, green, and blue lasers using dichroic filters and an optical scanning system. These internals—along with the necessary drive electronics—are built into a durable outer housing, as illustrated in the following image.

Laser Modules and Diodes
At its core, a laser module serves as the system's light source—much like a high-powered "lightbulb." The heart of this module is the laser diode, the specific component responsible for emitting light.
The industry has seen a significant shift in technology, evolving from traditional gas-filled tubes to Diode-Pumped Solid State (DPSS) systems, and finally to modern Pure Diode technology. Pure diodes have become the gold standard because they offer superior reliability and a significantly longer lifespan compared to their predecessors.
Because these diodes are highly sensitive, professional-grade modules integrate a component called LASORB. This acts as a shield against Electro-Static Discharge (ESD) and power surges, which are the two primary causes of laser failure.
You can see why you want to have LASORB inside of your module, by watching this video: How LASORB protects your laser diodes

For specialized environments like stadiums, high-end projectors utilize Optical-Pumped Solid-state Lasers (OPSL). These are prized for their extremely low beam divergence; by keeping the light beam tighter over long distances, the laser maintains its intensity and clarity where standard diodes might soften.
The Optical Scanning System
An optical scanning system is really the heart and soul of a laser show projector. It consists of two small electronic motors placed inside of a mount on an X and Y axis. Each of the motors has a mirror connected to it, to reflect laser light. And on the bottom of the motor there is a position detector, to receive a control signal from a laser control system. These motors are driven by a servo amplifier.
When the scanners receive the signal from your laser show control system, they move back and forth at very rapid speeds, reflecting the laser light off of them and allowing you to project 2D and 3D laser show images and displays.
- Galvos (Scanners): Two high-speed motors (X and Y axis) with mirrors that reflect the beam.
- Servo Amplifier: The drive electronics that send signals to the motors.

Understanding Power and Brightness
Laser show systems come in a wide variety of power levels, and the overall power output from a laser projector can be one of the most important factors to consider when choosing the right laser system for your desired application.
Laser power is measured in Watts (W) or milli-watts (mW) (1W = 1,000mW). However, specs can be deceiving.
Output Power vs. Internal Power
Many manufacturers advertise the power measured inside the module. However, because every mirror or lens causes a small loss of light, the only measurement that matters is the power at the output window.
- Be Wary of "Apparent Brightness": This is a marketing term. A 1W "apparent brightness" laser may not actually output 1W of power. Always ask for the real output power at the window. All Pangolin-sold projectors list power at the output window so you get exactly what you pay for.
- Minimum / Maximum output power: In this case, the maximum laser power is what is produced inside of the laser - It is NOT what you will get at the output window.
Choosing the Right Wattage
| Power Level | Suggested Application |
|---|---|
| Low (500mW - 3W) | Small/medium clubs, home use, small private events. |
| Medium (3W - 12W) | Large indoor venues, outdoor beam shows at night. |
| High (15W - 40W+) | Stadiums, festivals, long-distance architectural projections. |
Colors, Modulation, and Blanking
The RGB Balance
Most projectors use Red, Green, and Blue (RGB) sources to create a full spectrum of color. To achieve the best white balance and color variety, a "good ratio" is typically:
- 20-30% Red
- 30-40% Green (The most visible color to the human eye)
- 40-50% Blue (The cheapest source)
Budget manufacturers often overload a system with cheap Blue light to claim "high power," but the resulting colors will be unbalanced and muddy.
Analog vs. TTL Modulation
There are two types of modulation when it comes to lasers. These include “analog” and “TTL” based systems. Without getting too technical, if you use an analog laser projector with good linear modulation, you can create millions of different color combinations and evenly fade in and fade out between those colors when creating different laser effects.
If you have a TTL based laser, you are limited to only seven colors in total, and you cannot fade in and fade out across different colors. Budget level lasers or those which are lower in price are usually TTL based. While more professional lasers tend to be analog modulated.
Blanking
This is an externally caused by a change in laser power, which turns the laser on and off and also allows for the fading of colors.
Blanking, or disabling laser output in a specified area when projecting an image is commonly used when drawing laser animations to separate image components, so they are not connected by a low power line.
For example, if the word “TEXT” is projected, a properly blanked laser with analog response and a good linear balance would turn off (0% power) between each letter of the word, allowing you to clearly see each letter in the projected image.

Whereas in less professional laser systems, you will see a line or tail going through part of word, as illustrated in the “TEXT” example below.

Scanning Speed (KPPS)
Most laser projector manufacturers use the term “KPPS” or Kilo Points Per Second, when defining optical scanning speeds. So if you see specifications like “20K, 30K, 40K, 60K, etc., when looking at the speed of your laser, this is the speed in which your laser's scanner can produce.
Another factor that is just as important as the speed of the optical scanning system is the angle which it is specified at. The optimal scan angle for most laser projectors is 8°.
This standard was set by the International Laser Display Association, who oversees most laser specifications that are set on the market currently. We use 8°, as this is generally the smallest scan angle you would need to use in a real world scenario.
| Speed @ 8° | Best For |
|---|---|
| 30K | Beam effects and basic graphics/text. |
| 40K - 50K | Sharper graphics, complex logos, and flicker-free text. |
| 60K | High-fidelity displays and professional animations. |
Some people will say “30K @ 4°”... Again in this specific case, you want to be careful. Because 4° is not the correct angle to measure a scan speed at. The ILDA test pattern which is used to measure scan speeds was designed to be measured them at 8°.
Therefore when measured properly, a specification such as "30K at 4° does not actually have a "30K" scan speed. With that kind of specification, you cannot expect to have a true "30K" projector, as denoted by the international standard.
Another important thing to consider when looking at optical scanning systems on your laser show projector, is the optical degrees it can project at, on an X and Y axis.
For example, some people will say +/- 60° optical on the X and Y axis. You want to take note of this, because the angle you can project at directly effects how large of a projection area you can cover with a single laser. Better lasers on the market will start at +/- 60° optical on the X and Y axis.
Here is an overview of optical scanning specifications, and how they related to the effects you can create.
| 30K @ 8° (+/- 60+° optical on the X and Y axis) | This will be well suited for laser beam effects, and it can also be used for basic laser graphics, text and logo projections. The +/- 60° optical is a pretty large scan angle, and will allow you to cover a relatively wide projection |
|---|---|
| 40K @ 8° (+/- 60+° optical on the X and Y axis) | This will be well suited for laser beam effects, and it will also give you sharper looking laser graphics, text, and logo projections. |
| 50K @ 8° (+/- 60+° optical on the X and Y axis) | This will be well suited for laser beam effects, and it will also give you very sharp looking laser graphics, text, and logo projections. |
| 60K @ 8° (+/- 60+° optical on the X and Y axis) | This will be well suited for nearly any type of laser display you might wish to create. However, there are only a few optical scanning which can really achieve this speed. |
Laser Light Show Projector Purchasing Guide
There are so many different types of laser light show projectors, and laser manufacturers on the market today. Trying to determine which brand, model, or type of laser projector you need can be quite stressful, as the components of your laser can directly impact the quality of shows you’re able to create.
The choice generally comes down to your venue size and how often you'll be on the road. For example, within the Pangolin ecosystem the Unity RAW series is the go-to for mobile DJs and small club owners who need an affordable, high-impact beam show. If you are moving into the professional production space, the Unity ELITE series offers a more rugged build and better internal components for touring. At the top of the pyramid sits KVANT, specifically their ClubMAX line, which is the industry standard for permanent installations and high-fidelity graphics where color precision and beam tightness are non-negotiable.
The "brain" of your laser is arguably more important than the wattage. An FB3 system is an external DAC (Digital Analog Converter), which is great for a single laser setup but creates a "cable mess" if you're trying to sync multiple units. Conversely, the FB4 is integrated directly into the projector. This allows you to control the laser via a standard Ethernet cable, or even run it directly from a lighting console using DMX or Art-Net. For anyone planning to grow their show beyond one or two units, the FB4 is almost always worth the extra investment.
Safety is also a major part of the purchase. In the United States, you cannot legally fire a professional laser without a variance from the FDA. Fortunately, purchasing through Pangolin, we handle your initial necessary paperwork required to stay legal.
When comparing models, don't just look at the wattage. While a 3W laser is plenty for a 500-person room and a 10W+ unit is needed for outdoor festivals, you must also consider the Scanning Speed (Kpps). A higher Kpps (like 40k or 60k) ensures that text and graphics look crisp and flicker-free. Additionally, pay attention to Divergence; a lower milliradian (mrad) rating means the beam stays thin and sharp over long distances rather than spreading out and losing its "punch."
Finally, remember that even the most expensive laser is invisible in clear air—your budget should always include a high-quality haze machine to ensure the beams are actually visible to your audience.
Conclusion: Illuminating Your Decision
Choosing the right laser projector is a balance between technical specifications and practical application. While it’s easy to get caught up in the "wattage war," the true quality of your show is defined by the precision of your scanners, the reliability of your control system, and your commitment to safety standards.
Ultimately, the best investment is one that scales with your ambition. Whether you are starting with a Unity RAW for local gigs or installing a fleet of KVANT ClubMAX units for a festival mainstage, prioritizing an integrated FB4 system and low-divergence optics will ensure your visuals remain sharp, professional, and compliant for years to come.
By matching your hardware to your venue size and ensuring you have the proper atmospheric haze to back it up, you aren't just buying a light—you're investing in a high-impact visual experience that will captivate any audience.
